Tuesday, December 18, 2012
Nail Foils - Nail Art Stickers
Hehe, this set of nail foils were bought in Ximending, Taipei when I last went there for business trip. I like it for the tribal design it has and fact that there is NO WAY I could have done that myself on my nails! What's more, this set of nail foils glow in the dark!
How pretty they look on my nails! The more I look at them, the more they seem to be a real paint job! I'll face the truth. Though I can do nailart, such in-depth and elaborated design is one I definitely cannot do it, not with my current skillset, haha!
Shot taken further from the camera. Doesn't really look like nail foils, ya?
Also took my nails under broad daylight. I'm loving it and gonna get more of the foils soon!
Saturday, July 14, 2012
Blue Dotty Art Manicure
This time, I put on my latest nail polish haul from Rubi - 'Blue Suedes Shoes'. As usual, I added a little art in addition to the blues for some design, polka dots!
I love how vibrant this shade of blue looks on my nails, and reminded me of ocean. Vibrant as it looks, application for this nail polish wasn't easy at all. It dries pretty fast, almost at the point when I just took a brushful of it onto my nail. Thus, I nearly re-dip everytime I applied once on my nail. Oh, and a test of speed as well, haha! This nail polish definitely requires a minimum of 3 coats in order to ensure its beauty.
It was pretty amazing to see how different the blue tone has changed in accordance to the lighting. It seems so neon and bright under white light yet dark and navy-looking under warm light. Still, I like its colors and effect alongside with the dots I applied!
Well, as I mentioned above, the application for this nail polish might not be the most successful or smooth compared to others but honestly, I couldn't complain much either. This nail polish haul was by far the cheapest haul I've gotten for it only cost me $1! Such effect cost at only $1, I should say it is a good bargain with pretty result!
Now, all I need to do is to clear all my dramas so I can focus back on my nails!
Saturday, June 16, 2012
Nail Art Stickers (Water Decals) - Tutorial
After being a nail art addict for a period, I've yet to touch base on nail art stickers. NEVER. Thanks to my friend, I was finally able to experience my 'first' nail art sticker process!
My dear friend brought us a few nail art sticker designs from her sponsor and got me, along with another friend to choose. I chose a Pink Leopard Printed nail art sticker set for this attempt. Yeah, so expected of me ya? Hehehe...
From the look of it, it's pretty gorgeous, isn't it? Frankly, I was kinda nervous yet curious about how this whole thing works. Nonetheless, I came prepared and my nails were all cleaned before this 'experiment'. That's the most important and also the first thing that needs to be done before anything gets started! Now, let's move on to the process.
First, what we did next was cut out all the nail art stickers individually from the set and put them all into a bowl of water. That's right, a bowl of water is what you need! Leave it be for a good 2-3 minutes before you use a tweezer to pick it up from the water. You will notice the sticker's starting to peel open.
Next, put it over your nail (according to your nail size). Use a cuticle stick to omit the air from the sticker and smoothen the surface.
Once you deem ok to proceed, apply a layer of top coat on your nail stickers. The stickers will start to work their magic (start to bend).
Wait for them to semi-dry, followed by using a nail filer to file the excess away. Once done, it will look like this.
Yes, there's bubble on my nail so please pardon my noob-ness since it's my first try! If you do not wait for your nails to dry upon applying the top coat, here's the consequence you will face (I got mine T.T):
*sob* It's so wasted! I could almost enjoy a damage-free set of nail art stickers on me!
After my dear friend did a few nails for me, I decided to experiment it on my own so as to understand the complexity of doing this.
It really wasn't easy for me to complete the whole process within an hour, which in this experiment/attempt, we took slightly longer than that. Upon completion, I was practically immersed with my own nails!
Another few shots on my new achievement, full view!
I really love this set of Pink Leopard Printed nail art stickers, especially when they're on me!
Well, this was a truly fun and exciting experience for me, though it took us quite some time to complete our nails. I reckon once we are used to the process, the time taken will definitely be much lesser. The nail art stickers aren't costly, hence for those who are not exactly into freehand nail art but want to have fancy nail designs, you may just wanna try it!
Sunday, April 8, 2012
Travelling Extravaganza - Seoul
Though my eye was still under recovery then, I applied nail lacquers for the trip for vanity's sake and also to console myself not to keep thinking of my condition. With that, I took Color Club's Otherworldly from my nail lacquer stash & applied them onto my nails.
Seriously, I've bought it more than 3 months ago but I had no idea why I did not use it till now. Perhaps I was hoping the blue and the glitter will elevate my mood somehow. Nonetheless, the application for Otherworldly is very smooth and I only used 2 coats for this.
Being one who love Seoul, this trip wasn't very enjoyable to me due to one and annoying reason - my eye. As mentioned in my previous blog post 'Eye Infection Gone Bad', my eye's condition had gone terribly bad during my trip there. I was really thankful to my partners in Seoul who took such good care of me & even offered to bring me to an eye specialist just to get my eye checked. Without them, I'd have freaked out in a foreign land!
话说回来...although I did not truly enjoy my trip (physically), I did manage to do some retail therapy there, heh. My shopping desire in Seoul was pretty objective - Hair accessories, anti-dust caps if any and foot masks (since I'm allergic to most korean skincare products). My most extensive loot? Definitely the iPhone anti-dust caps and hair accessories! I basically had a serious overhaul on these 2!
| iPhone anti-dust caps! Some are giveaways, some for self-keeping of cos! |
| Hair accessories overhaul! Some on the right were for my girl, the rest...MINE! |
Let me get my eye fully recovered and I'm sure I'll be able to tune my mood back to normal & blog with more energy again!
Friday, December 30, 2011
Kitty Craze, Kitty Nails ~ Hello Kitty
With my recent craze in Hello Kitty (all thanks to that special someone), I decided to do up a Hello Kitty nails for my business trip to KL. I wasn't really confident in freehand, especially a kitty but i decided to do it anyway.
Haha, as you can see from the photo, my kitty design wasn't perfect. As i really isn't a professional at freehand yet, i didn't realised my french manicure was too thin to fit in hello kitty's ribbon! What a muddle-head i am!
Hope it didn't too weird & un-kitty-like in this nail art, hehe...
Thursday, November 17, 2011
Leopard Prints French Manicure
Maybe it's time to try out other leopard colours for the fun of it? I do know one of my colleagues LOVE leopard prints to the MAX! Perhaps I shall do another design to surprise her!
Friday, October 7, 2011
Dotting Fun~
Sometimes, i would really run out of ideas on what design to use for my nails & let my subconscious takes over. This time, it really did.
Felt a little bored with french tips polka dots, i decided to dot with another style. I promise this was really an impromptu thingy. The base i used waa in fact a hot pink but i guessed the warm light made it looked like red...Added some glitters on the dots also to reduce the dullness.
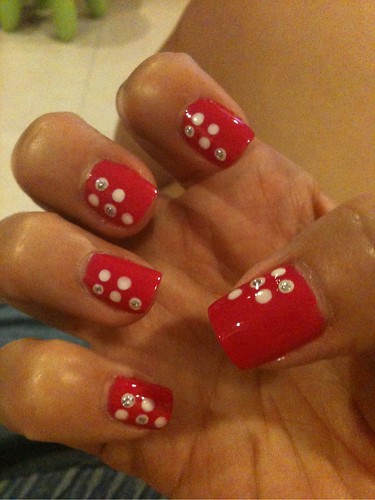
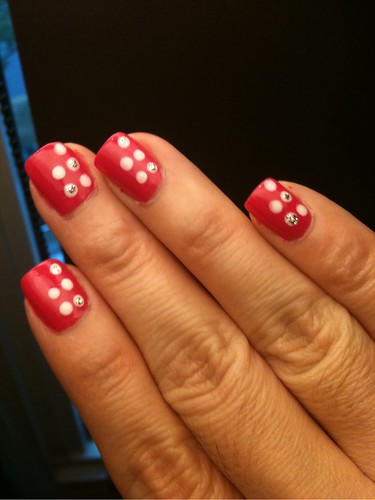
So how do you find this design? Recently, i feel that nice & pretty nails doesn't really need complicated designs. Simplicity with some self-generated creativity can be a beauty too ^^.
Tuesday, August 30, 2011
Sand-Storm Nails
Today, the nail design i'll be posting is kinda impromptu design for my birthday week. I know it should be designs of balloons or candles but unfortunately, it didn't register into my mind at that point of time., hahaha! Using Etude House's minty green and FaceShop's shimmer nail polishes, I freehanded my 'sand-storm' waves!
No balloons, no candles! Though i may not have painted those for my bday, i may just as well do it for a other occasion!