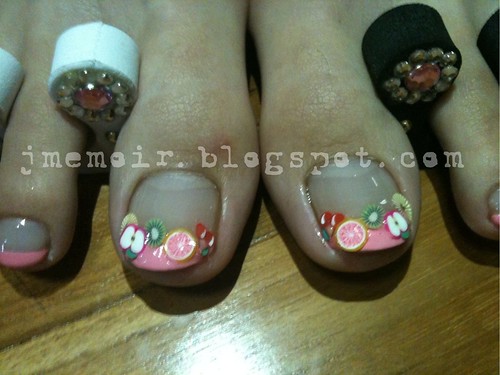
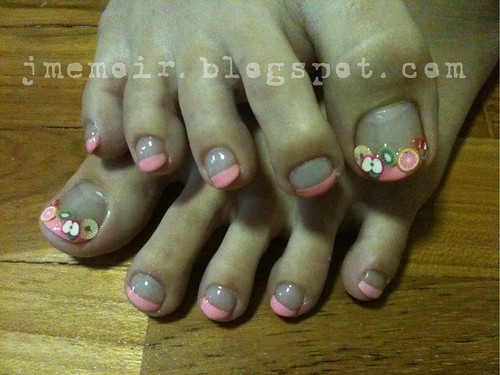
Did a pedicure nail art for a friend of art recently and I thought I could have posted them up here.
It was my first attempt at doing nail art on someone else's hands/feet so was kinda nervous too. I really want to thank my friend, Felicia, for volunteering herself to me when she heard that my hobby is DIY manicure ^^. That was really brave of her so KUDOS to you gal!
Her nail beds on her feet was SOOOOO flat that they were really easy to paint on! As she really fancies pink, I did a pink french pedicure from Eilanto on her and added some fruits for decoration. :D
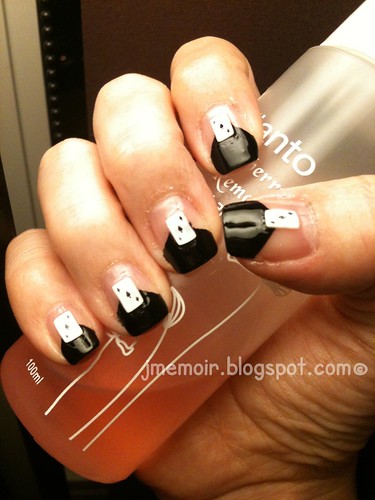
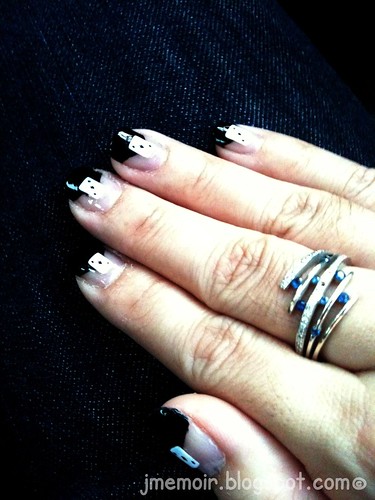
Do you find the nail design on her hands look somewhat familiar to you? That's right, it was my original nail design from 'Manicure for a wedding'. She was involved in the wedding as well and she told me she totally loved my bling bling manicure that looks like gel polishes!
Not to shabby for a 1st attempt on others I hope ^^.
Showing posts with label fimo nail art. Show all posts
Friday, August 5, 2011
Wednesday, May 18, 2011
In the Mood for Poker~
My original intention was french manicure, really. But right after i took out the the colors I wished to work on for my french manicure, I changed my mind instantly.
Just like a flash of lightning, I changed my manicure into a black half-V tape manicure with poker-designed fimo slices instead of the french manicure I wanted to do. The black nail polish I used was from The FaceShop. Upon completion, I felt the manicure was rather simple...or so I thought. However, when i went to work the next day with this fresh set of manicure, my colleagues were all complimenting me saying that this manicure nail art looked nice & classy! That really gave me lots of encouragement and acknowledgment on my creativity, hehe ^^.
Next up will be french manicure, I promised!
Just like a flash of lightning, I changed my manicure into a black half-V tape manicure with poker-designed fimo slices instead of the french manicure I wanted to do. The black nail polish I used was from The FaceShop. Upon completion, I felt the manicure was rather simple...or so I thought. However, when i went to work the next day with this fresh set of manicure, my colleagues were all complimenting me saying that this manicure nail art looked nice & classy! That really gave me lots of encouragement and acknowledgment on my creativity, hehe ^^.
Next up will be french manicure, I promised!
Sunday, May 15, 2011
Pedi Nail Art~
Blogger was having issues for the past 2 days, literally ruining my blog layout (It got 'rollback'), not to mention unable to post at all during that period.
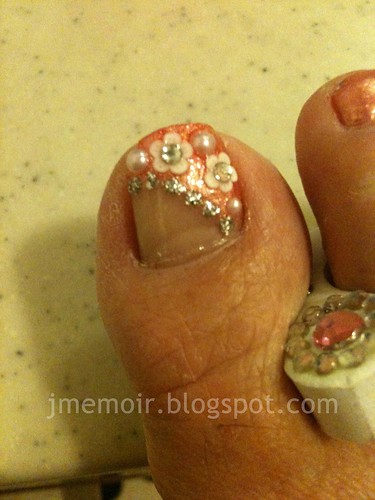
So, this is a dated post which I should have posted days before but well...Anyway, just some time ago, I did my very 1st nail art on my feet. Was amazed at myself for being able to come up with such a design which practically gushed through my mind at the very last minute!
Not exactly a very complicated nail art but the following was what I used to complete this nail art:
1) Nail Polish - Etude House unnamed (it's peachy-pink)
2) Silver Glitter Nail Art Polish from PR International
3) Fimo Art Slice - White Flower
4) Nail Art Pearl Beads
5) Transparent Rhinestone (placed on top of the Fimo Flower), recycled from Lubu Heels Manicure Nail Art
This is definitely my 1st on the feet, and I hope I will have more inspiration to do a better one after this...and beyond!
So, this is a dated post which I should have posted days before but well...Anyway, just some time ago, I did my very 1st nail art on my feet. Was amazed at myself for being able to come up with such a design which practically gushed through my mind at the very last minute!
Not exactly a very complicated nail art but the following was what I used to complete this nail art:
1) Nail Polish - Etude House unnamed (it's peachy-pink)
2) Silver Glitter Nail Art Polish from PR International
3) Fimo Art Slice - White Flower
4) Nail Art Pearl Beads
5) Transparent Rhinestone (placed on top of the Fimo Flower), recycled from Lubu Heels Manicure Nail Art
This is definitely my 1st on the feet, and I hope I will have more inspiration to do a better one after this...and beyond!
Monday, May 9, 2011
Strawberry Nails Tutorial
Oh well, It's time I start blogging back my obsession of the moment! This time, I attempted something daring and honestly speaking, it's my first detailed nail art - Strawberry Nails!
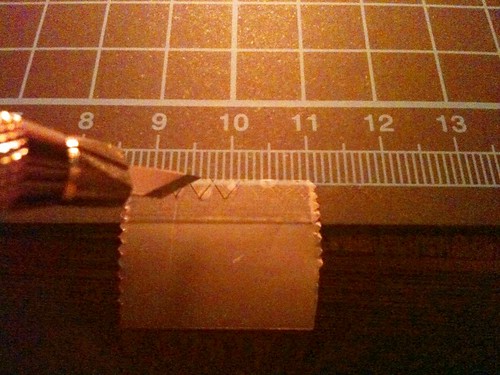
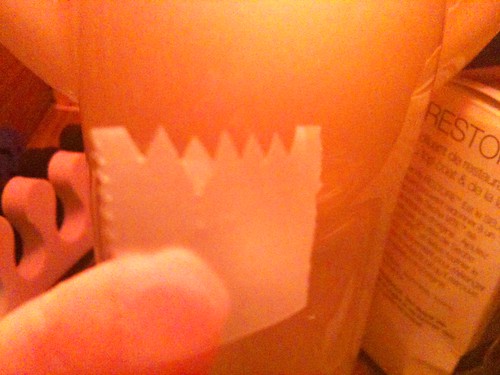
I'm not one who is very good at drawing, thus, I decided to use another method for the strawberry leaves instead of drawing them. That's it, Tape! It's really an alternate way to get the look of the leaves other than drawing them!
Used an art knife to cut the triangular shapes instead of a scissors. It works better ^^.
I deliberately cut more than what I think my nails can take so as to avoid any mistakes when I am in actual progress. It will really be a headache if your nails are already painted then you realise you still need to do further tape cutting. But yes, I did all these tape designs before I did anything to my nails :D
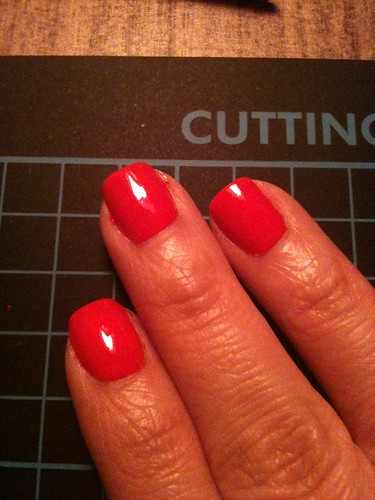
After all the tape designs for all my 10 nails were completed, I started painting my nails. First, paint your base color! Since this is Strawberry Nails, the base's naturally gonna be RED. For this red color, I used Etude House's chili red nail polish which is unnamed but termed RD103. Love the smooth application!
Next, wait for them to dry a little and applied top coat on them. For me, I used Seche Vite Fast Dry Top Coat precisely due to the fact that it dries my nails in a god speed manner. A ridiculously good companion for nail art & tape manicure! After SV has been applied, wait for a brief 2-5 mins and get your tapes on your nails for a fun tape manicure session , hehe.
Well, this photo's slightly blurred but I think it still shows how I placed the tape on my nail. Since it's gonna act like a strawberry leaf, it really doesn't matter if you want to place the tape just the way I place mine, or you want to place it at the tip. It all depends on which angle you want to look at your strawberry nails. If you look carefully on the photo, on my index finger, you will see how it will look like after you coated the un-taped area with green color. For me, I used Eilanto's cheery green which contains slight shimmering. Once again, it is unnamed with a number. Remember, peel the tape away the moment you have finished painting the un-taped area. DO NOT wait till it's dried or the applied lacquer will peel along with the tape.
Once all nails are taped and applied with green lacquer, it's time for dotting fun! In this tutorial, I did not take any photos of the dotting as my hands were all full :( Nonetheless, just DOT away with fun as the dots are meant to act as the 'seeds' of the strawberries on your nails! Last but not the least, apply Seche Vite (SV) on your finished product a.k.a your 10 yummy nails.
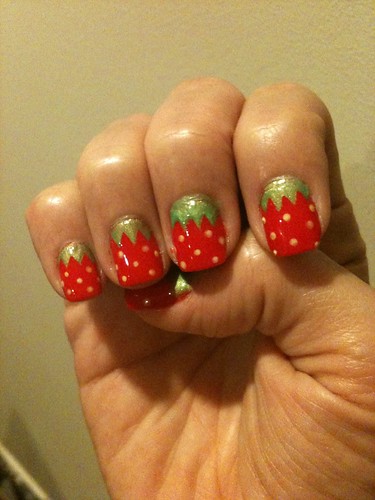
There you go, 10 yummylicious Strawberries on your very own nails!
It was my first attempt thus, there's definitely flaws somewhere in the midst of doing this piece of nail art but I am definitely proud of myself for being daring enough to attempt it, much less to see that it's quite a fine piece of art on my very own nails!
This nail art had lasted me for at least a week. Being a clumsy person I always have been, it's pretty lasting already! If you are careful enough, I believe they can last you for more than a week for sure :D
Hope you enjoyed the tutorial on Strawberry Nails. More to come soon :D
I'm not one who is very good at drawing, thus, I decided to use another method for the strawberry leaves instead of drawing them. That's it, Tape! It's really an alternate way to get the look of the leaves other than drawing them!
Used an art knife to cut the triangular shapes instead of a scissors. It works better ^^.
I deliberately cut more than what I think my nails can take so as to avoid any mistakes when I am in actual progress. It will really be a headache if your nails are already painted then you realise you still need to do further tape cutting. But yes, I did all these tape designs before I did anything to my nails :D
After all the tape designs for all my 10 nails were completed, I started painting my nails. First, paint your base color! Since this is Strawberry Nails, the base's naturally gonna be RED. For this red color, I used Etude House's chili red nail polish which is unnamed but termed RD103. Love the smooth application!
Next, wait for them to dry a little and applied top coat on them. For me, I used Seche Vite Fast Dry Top Coat precisely due to the fact that it dries my nails in a god speed manner. A ridiculously good companion for nail art & tape manicure! After SV has been applied, wait for a brief 2-5 mins and get your tapes on your nails for a fun tape manicure session , hehe.
Well, this photo's slightly blurred but I think it still shows how I placed the tape on my nail. Since it's gonna act like a strawberry leaf, it really doesn't matter if you want to place the tape just the way I place mine, or you want to place it at the tip. It all depends on which angle you want to look at your strawberry nails. If you look carefully on the photo, on my index finger, you will see how it will look like after you coated the un-taped area with green color. For me, I used Eilanto's cheery green which contains slight shimmering. Once again, it is unnamed with a number. Remember, peel the tape away the moment you have finished painting the un-taped area. DO NOT wait till it's dried or the applied lacquer will peel along with the tape.
Once all nails are taped and applied with green lacquer, it's time for dotting fun! In this tutorial, I did not take any photos of the dotting as my hands were all full :( Nonetheless, just DOT away with fun as the dots are meant to act as the 'seeds' of the strawberries on your nails! Last but not the least, apply Seche Vite (SV) on your finished product a.k.a your 10 yummy nails.
There you go, 10 yummylicious Strawberries on your very own nails!
It was my first attempt thus, there's definitely flaws somewhere in the midst of doing this piece of nail art but I am definitely proud of myself for being daring enough to attempt it, much less to see that it's quite a fine piece of art on my very own nails!
This nail art had lasted me for at least a week. Being a clumsy person I always have been, it's pretty lasting already! If you are careful enough, I believe they can last you for more than a week for sure :D
Hope you enjoyed the tutorial on Strawberry Nails. More to come soon :D
Sunday, April 24, 2011
Happy Easter Day!
Happy Easter Day everyone!
Although I do not really celebrate Easter Day, I was inspired to design a DIY Easter Manicure for myself now that I am so into DIY manicure, hehe.
Initially, I wanted to create Easter Egg Manicure on my nails. You know, those that have many different colors of easter eggs with polka dots on them. However, it seems that many people are already adopting that idea, or rather, using multiple colors to represent easter, and so, I decided on another design instead.
For this design, I did not use any China Glaze or OPI nail lacquers. Just FaceShop and Etude House's nail lacquers - PP401 and GR606. Other than that, I also used a silver glittery nail polish that comes with a thin brush from PR International to draw boundary lines between my 2 colors. I didn't plan on a tutorial for this manicure as the colors were changed on a last minute basis where I originally wanted to match yellow with GR606 (green) but the yellow lacquer was too hard to apply (streaky). Adds on to my hate for creme-based lacquers, arghhh. Oh, and I added Fimo slices on them too. How can I forget my fimos, hehe!
The finished product of my Easter Manicure ^^. Although it's not very Easter (I think), I feel that the color combination along with my fimo slices (Thanks to my colleague for sharing her Easter Egg fimo cane with me!) do make this manicure a success :D Honestly speaking, this design looks kinda sweet on my nails :P
After this, I gotta rest my nails for a day or 2 to give them some treatment before I proceed to my next manicure. Can't torture them for the sake of beauty right?!
Although I do not really celebrate Easter Day, I was inspired to design a DIY Easter Manicure for myself now that I am so into DIY manicure, hehe.
Initially, I wanted to create Easter Egg Manicure on my nails. You know, those that have many different colors of easter eggs with polka dots on them. However, it seems that many people are already adopting that idea, or rather, using multiple colors to represent easter, and so, I decided on another design instead.
For this design, I did not use any China Glaze or OPI nail lacquers. Just FaceShop and Etude House's nail lacquers - PP401 and GR606. Other than that, I also used a silver glittery nail polish that comes with a thin brush from PR International to draw boundary lines between my 2 colors. I didn't plan on a tutorial for this manicure as the colors were changed on a last minute basis where I originally wanted to match yellow with GR606 (green) but the yellow lacquer was too hard to apply (streaky). Adds on to my hate for creme-based lacquers, arghhh. Oh, and I added Fimo slices on them too. How can I forget my fimos, hehe!
The finished product of my Easter Manicure ^^. Although it's not very Easter (I think), I feel that the color combination along with my fimo slices (Thanks to my colleague for sharing her Easter Egg fimo cane with me!) do make this manicure a success :D Honestly speaking, this design looks kinda sweet on my nails :P
After this, I gotta rest my nails for a day or 2 to give them some treatment before I proceed to my next manicure. Can't torture them for the sake of beauty right?!
Sunday, April 10, 2011
Tape Manicure + Fimo Nail Art
Alas, I am finally performing 2 types of nail art into 1, hehe...This time, I actually tried tape manicure + fimo nail art to see how nice/bad it'll turn out...on my first attempt on such combination.
First, I applied China Glaze's 'Side Saddle' on my nails. They actually looked kinda chocolaty purple but the chocolaty color has won the upper hand.
Next, I used scotch tape to perform tape manicure over my nails with Etude House's nail lacquer (no name). It's a peachy color though.
Looks more like gold than peach color ya? It puzzled me too when I saw the result...
Last but not the least, I added fimo ribbons onto my nails for more drastic effect!
There you go! My very own combination of manicure nail art! What do you think? Does it look nice and pretty? I kinda love the outcome of my very own manicure combination and I can't wait to try out more designs, my very own creation! ^^
First, I applied China Glaze's 'Side Saddle' on my nails. They actually looked kinda chocolaty purple but the chocolaty color has won the upper hand.
![]() |
| Pardon the mess - Forgot to clean up before snapping them down... |
Next, I used scotch tape to perform tape manicure over my nails with Etude House's nail lacquer (no name). It's a peachy color though.
Looks more like gold than peach color ya? It puzzled me too when I saw the result...
Last but not the least, I added fimo ribbons onto my nails for more drastic effect!
There you go! My very own combination of manicure nail art! What do you think? Does it look nice and pretty? I kinda love the outcome of my very own manicure combination and I can't wait to try out more designs, my very own creation! ^^
Wednesday, April 6, 2011
Fimo Nail Art ~ Yummylicious!
Was swatching a minty green nail lacquer from Etude House which I love the color very much & decided to add some fimo slices on them since they made quite a good combination ^^v!
This time, I used strawberry and apply fimos for my fimo nail art & they worked great with my minty green nail lacquer!
You might be wondering why i did not used the designs on all my nails. I kinda think it might be overkill if I was to put the fimos on all my nails. But, alternating looks fine too ya?
Oh my, can't wait to play with the rest of the designs of my fimos!
This time, I used strawberry and apply fimos for my fimo nail art & they worked great with my minty green nail lacquer!
You might be wondering why i did not used the designs on all my nails. I kinda think it might be overkill if I was to put the fimos on all my nails. But, alternating looks fine too ya?
Oh my, can't wait to play with the rest of the designs of my fimos!
Thursday, March 24, 2011
My Adventure with Fimo Canes
I really envy those people who had the luxury of time to go for manicure that turned out with pretty nails and nail art. Due to my heavy commitment with my child, I really can't afford the time to go for such enjoyment. And so, my recent obsession with nail lacquers spurred me into a craze of DIY manicure.
I've discovered from a shopping website that Fimo Canes a.k.a Polymer Clay are available for sale. Those fimo canes are those tiny weeny 3D sorta object which you can attach them on yr nails. I've seen photos of manicured nails with them and hence, I go ahead & ordered some fimo canes to try them out.
When my package arrived, I was so super happy with it & upon opening it, I finally saw how the fimo canes looked like...
Note my finger against the canes. VERY small only! They are not more than 5cm long per cane but they seriously make hell lot of fimo slices out of these little small rod canes! I cut them myself using a penknife & depending on your own preference, you can cut them up thick or thin ^^.
There, my own private collection of fimo cane slices cut all by myself. There's even a Hello Kitty design with it (center compartment)! Found the flower pretty matching to my current nail color, China Glaze's Flip Flop Fantasy & decided to conduct my 1st fimo nail art experiment.
Tada~! Though I think they will look better with more fimo but I really don't wanna waste my fimo slices when I already plan to change my nail color with another soon.
Am planning to order more fimo canes soon once I accessed my March's credit card damages! Can't wait!
I've discovered from a shopping website that Fimo Canes a.k.a Polymer Clay are available for sale. Those fimo canes are those tiny weeny 3D sorta object which you can attach them on yr nails. I've seen photos of manicured nails with them and hence, I go ahead & ordered some fimo canes to try them out.
When my package arrived, I was so super happy with it & upon opening it, I finally saw how the fimo canes looked like...
Note my finger against the canes. VERY small only! They are not more than 5cm long per cane but they seriously make hell lot of fimo slices out of these little small rod canes! I cut them myself using a penknife & depending on your own preference, you can cut them up thick or thin ^^.
There, my own private collection of fimo cane slices cut all by myself. There's even a Hello Kitty design with it (center compartment)! Found the flower pretty matching to my current nail color, China Glaze's Flip Flop Fantasy & decided to conduct my 1st fimo nail art experiment.
Tada~! Though I think they will look better with more fimo but I really don't wanna waste my fimo slices when I already plan to change my nail color with another soon.
Am planning to order more fimo canes soon once I accessed my March's credit card damages! Can't wait!
Subscribe to:
Posts (Atom)