Blogger was having issues for the past 2 days, literally ruining my blog layout (It got 'rollback'), not to mention unable to post at all during that period.
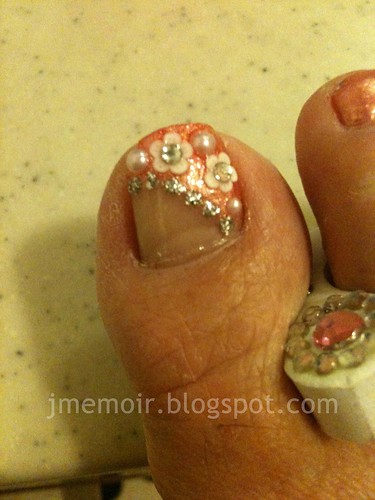
So, this is a dated post which I should have posted days before but well...Anyway, just some time ago, I did my very 1st nail art on my feet. Was amazed at myself for being able to come up with such a design which practically gushed through my mind at the very last minute!
Not exactly a very complicated nail art but the following was what I used to complete this nail art:
1) Nail Polish - Etude House unnamed (it's peachy-pink)
2) Silver Glitter Nail Art Polish from PR International
3) Fimo Art Slice - White Flower
4) Nail Art Pearl Beads
5) Transparent Rhinestone (placed on top of the Fimo Flower), recycled from Lubu Heels Manicure Nail Art
This is definitely my 1st on the feet, and I hope I will have more inspiration to do a better one after this...and beyond!
Sunday, May 15, 2011
Wednesday, May 11, 2011
Recycled Manicure
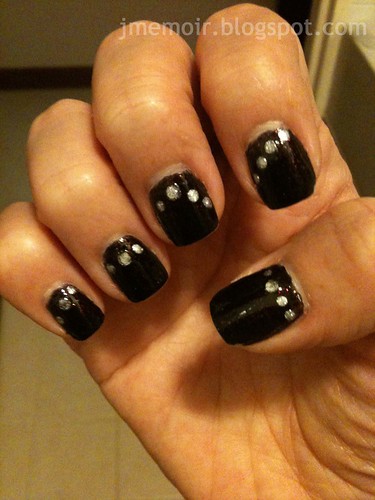
In my previous manicure where I painted my nails with Lubu Heels, I attempted a simple nail art with the help of 10 tiny (or not so tiny) rhinestones. After wearing them for about 4 days, some of my rhinestones dropped (unfortunately). In order not to waste my Lubu Heels' manicure, I decided to recycle it...
With my recent haul of 5 lovely dotting tools that come 10 different dotting sizes (at the precise timing), I dotted my 4-day old manicure away! The silver nail polish I used for dotting comes from China Glaze's The Ten Men.
As you can see from the picture, there was already a little chip from my thumb. However, I really hate to waste this manicure when the rest were pretty fine, only with the rhinestones bailing on me, hence the thought of recycling them. Not too bad of a recycled manicure ya? ^^
With my recent haul of 5 lovely dotting tools that come 10 different dotting sizes (at the precise timing), I dotted my 4-day old manicure away! The silver nail polish I used for dotting comes from China Glaze's The Ten Men.
As you can see from the picture, there was already a little chip from my thumb. However, I really hate to waste this manicure when the rest were pretty fine, only with the rhinestones bailing on me, hence the thought of recycling them. Not too bad of a recycled manicure ya? ^^
Monday, May 9, 2011
Strawberry Nails Tutorial
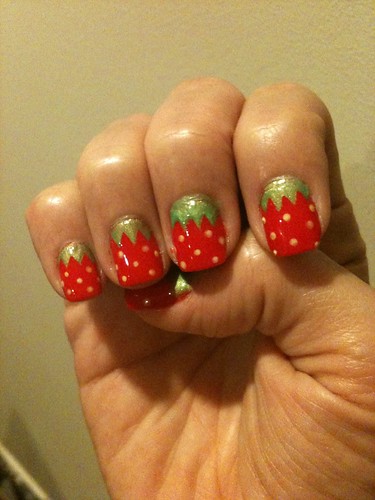
Oh well, It's time I start blogging back my obsession of the moment! This time, I attempted something daring and honestly speaking, it's my first detailed nail art - Strawberry Nails!
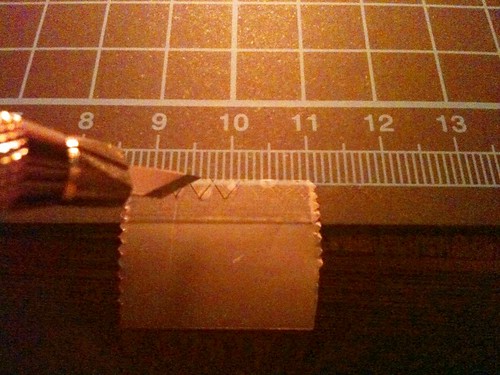
I'm not one who is very good at drawing, thus, I decided to use another method for the strawberry leaves instead of drawing them. That's it, Tape! It's really an alternate way to get the look of the leaves other than drawing them!
Used an art knife to cut the triangular shapes instead of a scissors. It works better ^^.
I deliberately cut more than what I think my nails can take so as to avoid any mistakes when I am in actual progress. It will really be a headache if your nails are already painted then you realise you still need to do further tape cutting. But yes, I did all these tape designs before I did anything to my nails :D
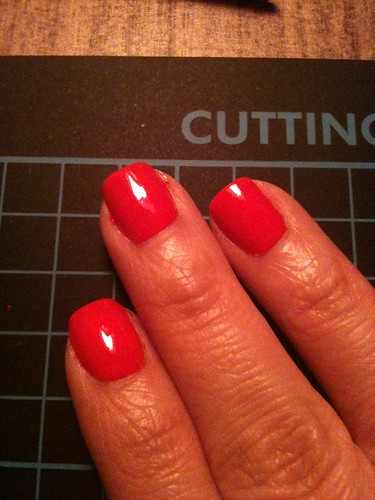
After all the tape designs for all my 10 nails were completed, I started painting my nails. First, paint your base color! Since this is Strawberry Nails, the base's naturally gonna be RED. For this red color, I used Etude House's chili red nail polish which is unnamed but termed RD103. Love the smooth application!
Next, wait for them to dry a little and applied top coat on them. For me, I used Seche Vite Fast Dry Top Coat precisely due to the fact that it dries my nails in a god speed manner. A ridiculously good companion for nail art & tape manicure! After SV has been applied, wait for a brief 2-5 mins and get your tapes on your nails for a fun tape manicure session , hehe.
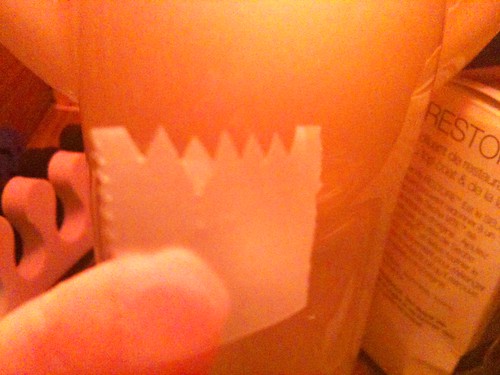
Well, this photo's slightly blurred but I think it still shows how I placed the tape on my nail. Since it's gonna act like a strawberry leaf, it really doesn't matter if you want to place the tape just the way I place mine, or you want to place it at the tip. It all depends on which angle you want to look at your strawberry nails. If you look carefully on the photo, on my index finger, you will see how it will look like after you coated the un-taped area with green color. For me, I used Eilanto's cheery green which contains slight shimmering. Once again, it is unnamed with a number. Remember, peel the tape away the moment you have finished painting the un-taped area. DO NOT wait till it's dried or the applied lacquer will peel along with the tape.
Once all nails are taped and applied with green lacquer, it's time for dotting fun! In this tutorial, I did not take any photos of the dotting as my hands were all full :( Nonetheless, just DOT away with fun as the dots are meant to act as the 'seeds' of the strawberries on your nails! Last but not the least, apply Seche Vite (SV) on your finished product a.k.a your 10 yummy nails.
There you go, 10 yummylicious Strawberries on your very own nails!
It was my first attempt thus, there's definitely flaws somewhere in the midst of doing this piece of nail art but I am definitely proud of myself for being daring enough to attempt it, much less to see that it's quite a fine piece of art on my very own nails!
This nail art had lasted me for at least a week. Being a clumsy person I always have been, it's pretty lasting already! If you are careful enough, I believe they can last you for more than a week for sure :D
Hope you enjoyed the tutorial on Strawberry Nails. More to come soon :D
I'm not one who is very good at drawing, thus, I decided to use another method for the strawberry leaves instead of drawing them. That's it, Tape! It's really an alternate way to get the look of the leaves other than drawing them!
Used an art knife to cut the triangular shapes instead of a scissors. It works better ^^.
I deliberately cut more than what I think my nails can take so as to avoid any mistakes when I am in actual progress. It will really be a headache if your nails are already painted then you realise you still need to do further tape cutting. But yes, I did all these tape designs before I did anything to my nails :D
After all the tape designs for all my 10 nails were completed, I started painting my nails. First, paint your base color! Since this is Strawberry Nails, the base's naturally gonna be RED. For this red color, I used Etude House's chili red nail polish which is unnamed but termed RD103. Love the smooth application!
Next, wait for them to dry a little and applied top coat on them. For me, I used Seche Vite Fast Dry Top Coat precisely due to the fact that it dries my nails in a god speed manner. A ridiculously good companion for nail art & tape manicure! After SV has been applied, wait for a brief 2-5 mins and get your tapes on your nails for a fun tape manicure session , hehe.
Well, this photo's slightly blurred but I think it still shows how I placed the tape on my nail. Since it's gonna act like a strawberry leaf, it really doesn't matter if you want to place the tape just the way I place mine, or you want to place it at the tip. It all depends on which angle you want to look at your strawberry nails. If you look carefully on the photo, on my index finger, you will see how it will look like after you coated the un-taped area with green color. For me, I used Eilanto's cheery green which contains slight shimmering. Once again, it is unnamed with a number. Remember, peel the tape away the moment you have finished painting the un-taped area. DO NOT wait till it's dried or the applied lacquer will peel along with the tape.
Once all nails are taped and applied with green lacquer, it's time for dotting fun! In this tutorial, I did not take any photos of the dotting as my hands were all full :( Nonetheless, just DOT away with fun as the dots are meant to act as the 'seeds' of the strawberries on your nails! Last but not the least, apply Seche Vite (SV) on your finished product a.k.a your 10 yummy nails.
There you go, 10 yummylicious Strawberries on your very own nails!
It was my first attempt thus, there's definitely flaws somewhere in the midst of doing this piece of nail art but I am definitely proud of myself for being daring enough to attempt it, much less to see that it's quite a fine piece of art on my very own nails!
This nail art had lasted me for at least a week. Being a clumsy person I always have been, it's pretty lasting already! If you are careful enough, I believe they can last you for more than a week for sure :D
Hope you enjoyed the tutorial on Strawberry Nails. More to come soon :D
Saturday, May 7, 2011
Polling Day 2011 - My 2nd Vote
Well, time does flies likes nobody business. With a blink of an eye, 5 years had passed. With that said, it was my 1st vote of my entire 25 years that I'd lived up to in year 2006. And to think my 1st vote in Year 2006 GE was under Tampines GRC where MBT resided...Its history already so am not gonna blurb who I'd voted for. Nah, not a chance!
Now, 5 years had passed & here comes my 2nd vote out of my 30 years. This time, I'm under Pasir-Ris Punggol GRC. However, for this round, i'm having mixed feelings on who to vote...I'm not one who's Anti-PAP or Anti-OPP, Pro-PAP or Pro-OPP. I'm just an ordinary woman who just want to place a vote on whichever party can do their part in benefiting my GRC. After listening to some rallies online (No luxury of time to attend rallies personally), I feel that both parties have their pros and cons. Till now (its Polling Day!), I still considering who to place my vote on...
It is not my place to discriminate any parties here so am not gonna make any comparison via my blog anyway. They have been compared in my heart and each has their own merits/flaws. Though PAP did offend me once with an issue i faced when i just shifted here, its not exactly one matter which i should use to turn my vote around. Neither should I turn my ears away from what the contestors (OPP) have to say either. This time, its really a difficult vote for me to make...
Questions to ponder regardless which side wins...If PAP wins, will they honor what they promised which they always do but never really fulfilled? If OPP wins, will they perform whatever they have proposed during the rally or in their manifesto for the next 5 years? If OPP really wins, do they continue with the plans PAP had done in progress or conduct their own plans?
Honestly, these questions popped in my head countless times and they are the ones that make me really in a difficult position to decide. Having said that, it does not sum up to any decision so readers, please do not mis-interprete. My decision and vote will be secret afterall!
Its just a few hours left to actual polling. I hope by the time i stepped into the polling centre, I can firm up my decision on who to vote.
Vote wisely...
Now, 5 years had passed & here comes my 2nd vote out of my 30 years. This time, I'm under Pasir-Ris Punggol GRC. However, for this round, i'm having mixed feelings on who to vote...I'm not one who's Anti-PAP or Anti-OPP, Pro-PAP or Pro-OPP. I'm just an ordinary woman who just want to place a vote on whichever party can do their part in benefiting my GRC. After listening to some rallies online (No luxury of time to attend rallies personally), I feel that both parties have their pros and cons. Till now (its Polling Day!), I still considering who to place my vote on...
It is not my place to discriminate any parties here so am not gonna make any comparison via my blog anyway. They have been compared in my heart and each has their own merits/flaws. Though PAP did offend me once with an issue i faced when i just shifted here, its not exactly one matter which i should use to turn my vote around. Neither should I turn my ears away from what the contestors (OPP) have to say either. This time, its really a difficult vote for me to make...
Questions to ponder regardless which side wins...If PAP wins, will they honor what they promised which they always do but never really fulfilled? If OPP wins, will they perform whatever they have proposed during the rally or in their manifesto for the next 5 years? If OPP really wins, do they continue with the plans PAP had done in progress or conduct their own plans?
Honestly, these questions popped in my head countless times and they are the ones that make me really in a difficult position to decide. Having said that, it does not sum up to any decision so readers, please do not mis-interprete. My decision and vote will be secret afterall!
Its just a few hours left to actual polling. I hope by the time i stepped into the polling centre, I can firm up my decision on who to vote.
Vote wisely...
Tuesday, May 3, 2011
Utterly Disappointed~!
This is a *rant* post.
It was Labour Day. It was also my Mum's birthday.
We were meeting up with my mum & my relatives for dinner as a form of celebrating her birthday & with my aunt's recommendation, we had dinner somewhere close to her house, as well as for her convenience. Hence, we had dinner at this restaurant located at Old Havelock Road...
It was utterly disappointing to have our dinner there! To think it's a birthday dinner somemore!
What this restaurant DON'T HAVE:
1) No Menu
2) Lack of Serving Crew
3) DO NOT serve chicken related dishes
4) Serve only dishes that are simple to cook, easy to cook
5) Seriously expensive!
Imagine, they recommended dishes like 'Minced Meat with Tau Kwa', 'Oyster Omelette', 'Duck Meat with Tau Kwa', 'Celery with Prawns'! All these dishes were so easy to prepare and cook! When my aunt asked about how they would cook pork with, the lady could replied, 'Stir-fried pork with spring onions'! What the hell!
We could even come up with excuses for them to have such simple dishes. Maybe the food's cheap that's why so many people come to eat? Maybe the food's really good? We wish but it wasn't those. The food is simply BLAND and SIMPLE! Even I also know HOW TO COOK! Especially the minced meat with tau kaw, who in the hell won't know how to make such simple dish? To think this plate of dish cost us 18 bucks!
Overall damage outta this dinner summed up to $200+. It was terribly expensive and we really had the 'scammed' look when she showed up the bill. By no means will we ever patronise this restaurant, EVER!
It was fortunate that my cousin didn't join us as I knew that should he be present, he will definitely kick a fuss out of this and lodge a complaint to CASE. I myself almost wanted to do the same thing but stopped myself from doing it cos there wasn't any photos (didn't have the time at that time) to back myself up with.
I felt bad for my mum though. It was meant to be a happy ocassion for her since it was meant to celebrate her birthday but to think we stumpled upon a 黑店 which robbed us of all the mood we had for that evening. Hope she didn't take it too hard...
A piece of advice to those who are searcing for good eating place, DO NOT patronise this restaurant unless you planned to be scammed by simple dishes and a big burnt in your wallet!
It was Labour Day. It was also my Mum's birthday.
We were meeting up with my mum & my relatives for dinner as a form of celebrating her birthday & with my aunt's recommendation, we had dinner somewhere close to her house, as well as for her convenience. Hence, we had dinner at this restaurant located at Old Havelock Road...
It was utterly disappointing to have our dinner there! To think it's a birthday dinner somemore!
What this restaurant DON'T HAVE:
1) No Menu
2) Lack of Serving Crew
3) DO NOT serve chicken related dishes
4) Serve only dishes that are simple to cook, easy to cook
5) Seriously expensive!
Imagine, they recommended dishes like 'Minced Meat with Tau Kwa', 'Oyster Omelette', 'Duck Meat with Tau Kwa', 'Celery with Prawns'! All these dishes were so easy to prepare and cook! When my aunt asked about how they would cook pork with, the lady could replied, 'Stir-fried pork with spring onions'! What the hell!
We could even come up with excuses for them to have such simple dishes. Maybe the food's cheap that's why so many people come to eat? Maybe the food's really good? We wish but it wasn't those. The food is simply BLAND and SIMPLE! Even I also know HOW TO COOK! Especially the minced meat with tau kaw, who in the hell won't know how to make such simple dish? To think this plate of dish cost us 18 bucks!
Overall damage outta this dinner summed up to $200+. It was terribly expensive and we really had the 'scammed' look when she showed up the bill. By no means will we ever patronise this restaurant, EVER!
It was fortunate that my cousin didn't join us as I knew that should he be present, he will definitely kick a fuss out of this and lodge a complaint to CASE. I myself almost wanted to do the same thing but stopped myself from doing it cos there wasn't any photos (didn't have the time at that time) to back myself up with.
I felt bad for my mum though. It was meant to be a happy ocassion for her since it was meant to celebrate her birthday but to think we stumpled upon a 黑店 which robbed us of all the mood we had for that evening. Hope she didn't take it too hard...
A piece of advice to those who are searcing for good eating place, DO NOT patronise this restaurant unless you planned to be scammed by simple dishes and a big burnt in your wallet!
Subscribe to:
Posts (Atom)