Sunday, December 23, 2012

DIY iPhone 5 Jelly Cases - Exclusively Mine!

Do you often come across those bling iPhone casing selling from shops, online stores or even Taobao? I'm sure you did. I'm also sure that you knew those bling/crystals are mostly, if not, entirely encased with hard iPhone casing. Well, I could have simply bought those casings for my iPhone 5 but there's a problem...I HATE Hard Casings!

I always love jelly casings ever since I wore one on my old iPhone 3GS. The glossy surface and rubberised material somehow make me feel that my phone is secured even at the edges, not to mention the odds of getting my phone scratched by the casing itself will be minimised to the smallest. So...I came up with the idea of DIY-ing my own bling casing for my iPhone 5, with jelly case of course!

That set my determination and purchases of the materials from Taobao. Afterall, where else can I buy materials at the lowest cost other than Taobao? In fact, I got rather greedy and bought far too many casings with tons of rhinestones (blings) to work on them! Gosh, will I even need so many casings in the first place!?

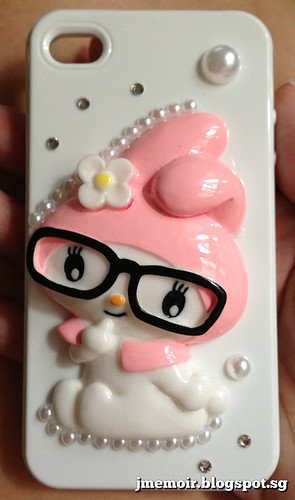
My first attempt was a white iPhone case with Melody.

I really love this Melody whom looked so studious! It was my first attempt hence, I didn't dare to put too many pearls and rhinestones for fret of overkill. However, after a day of consideration, I still decided to add on more...

Tada! More 'bling-ing', right?' Maybe to you, it still isn't bling enough but trust me, going for a first attempt on this made me feel skeptical to add more. And with that, my first DIY iPhone bling casing was completed!

Unfortunately, I was unable to enjoy my first bling casing due to an ultimate joke...The casing was NOT iPhone 5 casing! I was trying to fit this casing into my iPhone 5 when I discovered I wasn't able to fit the casing in! Stunned for at least 3 seconds, I came to my senses and knew it was the wrong casing (iPhone 4S). How sotong can I be????? DIY finished already then found out I used wrong casing...truly a WTF circumstance. In the end, I realised my seller packed this casing wrongly in my order (packed a iPhone 4S casing in a iPhone 5 casing box). I only tried 2 out of 3 to ensure they fit but lady luck just wanted to play a trick on me and purposely had the wrong one be the one I never tried on. Sad, ironic and comical as it can be, I didn't want to let this casing go to waste and gifted it to my BFF instead since she's still using iPhone 4S. Am so glad she loves it though!

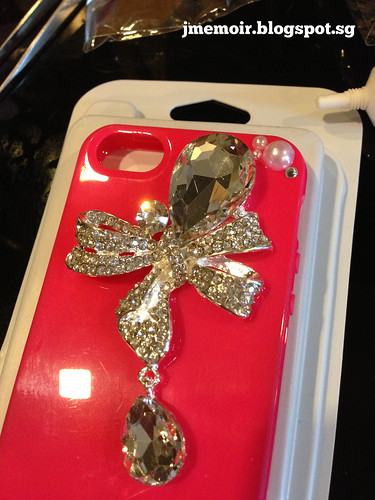
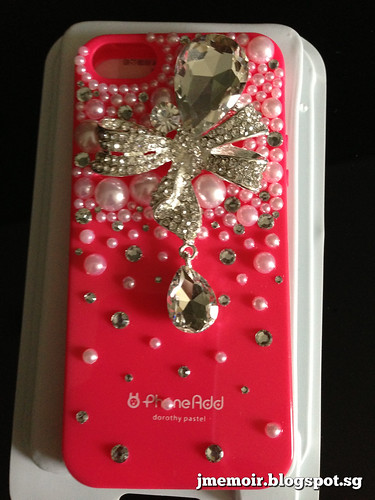
With that to be gifted to my BFF, I was back to square one with no bling casing of my own again. Determined to DIY a true bling casing for myself, I started on my 2nd attempt...this time, on my existing neon pink jelly case with another design.

This was how my casing looked like when I just started on it.

Big and beautiful piece of ornament it is ya? It wasn't easy getting it to dry if I continued with other areas and so, I gave it a rest for a day to let the glue beneath the ornament dry. I continued on the very next day and was hell bent on finishing it.

Such determination did yield results. I completed my DIY within 2.5 hours!

Not bad ya? I know such design might have already been available at stores so it is not uncommon. However, having such design on a jelly case is definitely a first! And Exclusively MINE!

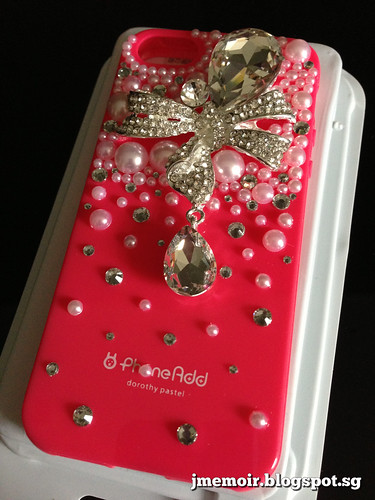
Also brought proud DIY bling casing out for Christmas gathering and took a beautiful shot of it at a boutique while waiting for my BFF.

I am getting the hang of DIY-ing the casings, especially since I can have the best of both worlds in terms of blings on jelly cases. Am gonna DIY more on the rest of the casings so I can rotate using them from time to time!

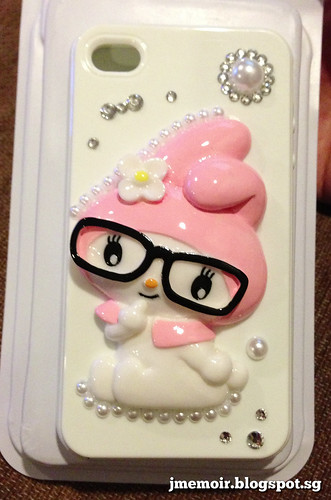
Oh wait, before I forgot, I also re-ordered the studious Melody since I really like it but am gonna stick it to a baby pink jelly case this round!


Tuesday, December 18, 2012

Nail Foils - Nail Art Stickers

I'll be VERY honest...I had been neglecting my nails for the longest time ever since I got hold of my iPad and engrossed in my dramas, online shopping and whatsoever. However, although I am not so avid in DIY-ing nailart anymore (I swear, I still do it but the frequency isn't gonna be as high as before now), I now adopt a faster method to still have nailart on my nails - Nail Foils!

Hehe, this set of nail foils were bought in Ximending, Taipei when I last went there for business trip. I like it for the tribal design it has and fact that there is NO WAY I could have done that myself on my nails! What's more, this set of nail foils glow in the dark!

How pretty they look on my nails! The more I look at them, the more they seem to be a real paint job! I'll face the truth. Though I can do nailart, such in-depth and elaborated design is one I definitely cannot do it, not with my current skillset, haha!

Shot taken further from the camera. Doesn't really look like nail foils, ya?

Also took my nails under broad daylight. I'm loving it and gonna get more of the foils soon!