Saturday, June 30, 2012

Miu Miu and Marc by Marc Jacobs

I have two bags recently added to my bag collection from Reebonz Sale (which I'll blog separately) and here are my 2 beautiful victory loot!

Miu Miu Vitello Caribu - Double Zip
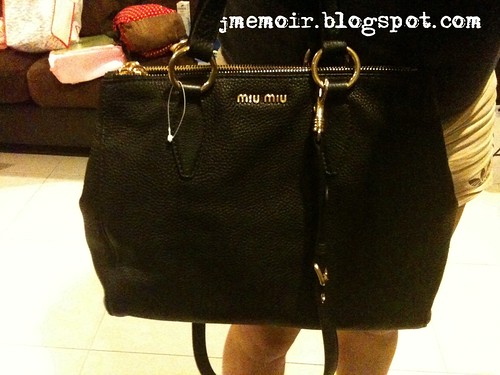
Saw this baby almost right from the beginning when I stepped into the Sale. Being made in calfskin material, the touch of the bag is so smooth & pleasant! Not only that, it comes with a sling strap so I can sling it on my shoulder should I feel tired from hand-carrying it! By the way, this year's bag trend tend to all come in straps.

Some may not find this anywhere unique or exclusive due to its colour being black, I do like the fact that it IS black. being the type of person who will go all careful and cautious when bringing a luxury bag out for fret of dirtying it, I won't need to worry that much when the bag is in black ^^.

So how much did this Miu Miu bag cost me? Retail price of this baby was going at $2,100. After a 20% discount and $100 voucher from Reebonz Sale + a further 5% discount using Mastercard for payment, she only cost me $1,520! That's a good $580 discount in total! I must say, it's a real steal! I have yet to bring this lovely bag out but I believe it won't be long. :D

Marc by Marc Jacobs - Rubber Croc Tote
Another steal I bought from the Sale will be my Marc Jacobs tote bag! Its croc-embossed design on the tote simply caught my eye! It was a daring buy from me though I usually hate to buy light-coloured bags precisely for fret of dirtying it, and feel damn guilty about it. However, this tote bag is in an unique shade of nude which made me re-consider. of course, price factor is another reason why I just simple bought it that day.

After going at a 40% discount from Reebonz Sale + an additional 5% discount from Mastercard, this large-size tote only cost me $200! For a Marc Jacobs bag of this size, $200 is really a snatch! This bag may turn out to be my work bag afterall, hehehe!

I will love to own another bag anytime but getting hold of them without further damaging my pocket should be a wiser move! Cheers to Sale!


Monday, June 25, 2012

Shoe Haul from Rubi Shoes Sale

This year's GSS is a really fruitful one for me, especially when it comes to shoes. For one, I've managed to grab a few pairs of shoes from Rubi Shoes! All those pumps, flats and heels going at crazy prices, who won't bring them home?!

Only 5 bucks!
My first pair of shoes from Rubi Shoes. Not only was it a first buy for me from Rubi Shoes, it was also my first attempt in buying/wearing floral-designed shoes!

Likewise, it's my first attempt in trying on bright-coloured shoes, especially turquoise!

Green-minty heels. Not that i'm a lover of green but the colour of this pair of heels just made me unable to resist the urge to bring it home with me!

Another pair of flats added to my shoe collection. I simply couldn't resist buying buying white/beige shoes.

Why am I so crazy buying so many pairs from Rubi Shoes? Not that I'm really crazy over Rubi Shoes but their sale prices for those shoes were simply dirt cheap! None of my shoes from Rubi Shoes cost me more than 10 bucks each, including the minty heels! I'm so gonna ensure I'll always watch out for any Sales from Rubi Shoes in future!!!


Saturday, June 16, 2012

Nail Art Stickers (Water Decals) - Tutorial

After being a nail art addict for a period, I've yet to touch base on nail art stickers. NEVER. Thanks to my friend, I was finally able to experience my 'first' nail art sticker process!

My dear friend brought us a few nail art sticker designs from her sponsor and got me, along with another friend to choose. I chose a Pink Leopard Printed nail art sticker set for this attempt. Yeah, so expected of me ya? Hehehe...

From the look of it, it's pretty gorgeous, isn't it? Frankly, I was kinda nervous yet curious about how this whole thing works. Nonetheless, I came prepared and my nails were all cleaned before this 'experiment'. That's the most important and also the first thing that needs to be done before anything gets started! Now, let's move on to the process.

First, what we did next was cut out all the nail art stickers individually from the set and put them all into a bowl of water. That's right, a bowl of water is what you need! Leave it be for a good 2-3 minutes before you use a tweezer to pick it up from the water. You will notice the sticker's starting to peel open.

Next, put it over your nail (according to your nail size). Use a cuticle stick to omit the air from the sticker and smoothen the surface.

Once you deem ok to proceed, apply a layer of top coat on your nail stickers. The stickers will start to work their magic (start to bend).

Wait for them to semi-dry, followed by using a nail filer to file the excess away. Once done, it will look like this.

Yes, there's bubble on my nail so please pardon my noob-ness since it's my first try! If you do not wait for your nails to dry upon applying the top coat, here's the consequence you will face (I got mine T.T):

*sob* It's so wasted! I could almost enjoy a damage-free set of nail art stickers on me!

After my dear friend did a few nails for me, I decided to experiment it on my own so as to understand the complexity of doing this.

It really wasn't easy for me to complete the whole process within an hour, which in this experiment/attempt, we took slightly longer than that. Upon completion, I was practically immersed with my own nails!

Another few shots on my new achievement, full view!

I really love this set of Pink Leopard Printed nail art stickers, especially when they're on me!

Well, this was a truly fun and exciting experience for me, though it took us quite some time to complete our nails. I reckon once we are used to the process, the time taken will definitely be much lesser. The nail art stickers aren't costly, hence for those who are not exactly into freehand nail art but want to have fancy nail designs, you may just wanna try it!